cat in the hat inspired PARTY IN A BOX

10.24.2014

Party in a box inspired by these shoes...

And my sister. Happy Birthday Jenn!


***everything except the striped napkins (Target) came from Hobby Lobby and my stash.

a new niece!

9.05.2014

We got some newborn snuggles in over Labor Day weekend! My brother and his wife just had their first daughter and she is tiny and soft and sweet.


new babies FTW! ;-)

DIY: Wall Sprinkles + Free Word Art

9.01.2014

While I wait to help my parents decorate their new retirement home (next month!), I'm slowly making changes to live well in our space here in Kansas.

I painted two walls in our bedroom, but wanted to make another statement wall opposite. Except no more paint, please.


Enter ... metallic contact paper! (find here) I originally wanted 2" polka dots, but my circle cutter just made a mess with the adhesive on the contact paper. So, plan B was 2" squares that I randomly placed across the wall in about 20 minutes.

It's fun and easily remove-able when I'm done. (Plus, it would make a fun statement wall for renters who can't paint their walls.)

I also made a little word art to finish up my typewriter vignette. I thought about putting it on the wall, but it seemed just right propped up behind my little Brother Valiant.


(I can't sell the print, because the colored banner and one of the fonts is for personal use only, but if you want this pdf in a different color, I can send you a copy for free!! Just leave a comment and I'll contact you.)

virtually madeover >> front door

8.06.2014

My parents have a new house (retirement!!) in Arkansas, and I've been attempting to use my love for decor to come up with ideas for their new home.

I've often thought that virtual makeovers would eliminate lots of DIY mistakes, but how to do them is the kicker. Layla is awesome at this, but me? I know a few Photoshop tricks, but that's just about it.

Insert this tutorial!! I was able to view all of the videos for free and learned how to do a virtual room makeover! So, without further ado...


... a virtual front door makeover! 


Currently the door is a light aubergine/mauvish color. No offense to the previous owners, but YUCK.

Using my fancy new *skillz* I've madeover the door in several new colors - keeping in mind the client, wink, wink. This was the easiest one to do, and thus the first reveal.

(Oh, and the chartreuse is a joke.)


I'm liking the blue (top left) and the green (middle right) the best. What's your fav?

You'll be seeing more of this as a fun little series as I take the time to virtually makeover several rooms in their new home - mostly so they can get an idea of the things they like, don't like, etc. and so I can have a visual with some of my ideas. Ya know, because some ideas are better left in my head. ;-)

Cheers!

DIY rustic phone cabinet

8.01.2014

Kitchen update is complete!! (See previous posts here, here, here and here.)

My last project in the kitchen is complete. After several weeks of "in progress" because of my lack of a table saw, I finished my rustic phone cabinet.

This idea was the answer to a clutter problem.

Do you have a spot where stuff always seems to accumulate without a second thought? Ugh. Our microwave is a magnet for clutter and I hate looking at it. With our tiny kitchen layout, every time we need to move the dishwasher to hook it up to the sink, we have to move the phone off and on and off ...

So, I thought, why not build a small cupboard to house the phone, cover the ugly phone jack (see the pic below) and clear up some of the visible clutter?


I had a source for rustic 1x4s, so I figured they would work perfectly as the phone base is right around 4" wide. So when my Dad brought his miter saw to help with a couple of projects, I got several weathered boards, and we went to work.

Very quickly, I realized that said 1x4s were indeed NOT 1" or 4" wide. I should've known this, but wasn't thinking...

My dad did some math and said he would have to rip some boards length wise in order to make the depth of the cabinet wide enough to house the phone. But the table saw is at his house, so it would be a few weeks before I got to work on the cabinet again.


Once I obtained my newly cut pieces, I started putting them together.

I used all of the free items items I could:
3 - 1"x4" fence boards
2 old hinges and screws from this project
reused turquoise knob
1" finish nails and 1" wood screws that I had on hand


I purchased:
1 magnetic hinge kit
4-pack L-shaped brackets
2" screws and 1/2" screws (for attaching brackets)

= about $6-7

 Here is a view from the inside.

- I used the small pieces of wood (extra from the ripping job) to piece together the corners and then two of the longer extras to put the door slats together.
- The left set of L-brackets are screwed into studs and the other two are just screwed into the drywall for a little stabilization. I was going to put them in with plastic anchors, but ran into some sort of duct that made it impossible to screw anything into. (de ga je!)
- The door hinges and magnetic closure are pretty self explanatory. :-)

Aren't the weathered variations so pretty?


I know my dishwasher/microwave combo isn't much to look at, but the pic gives some perspective on the cabinet. Doesn't this little nook look so much cleaner?


I have to admit - even with this "fix" the microwave is still a magnet for stuff, but at least it's not home to those things anymore.

Woot for a finished room!

bedroom decor update

7.30.2014

So, I've done a little bedroom updating and haven't completed it -- but I decided to show you the "in progress" view anyway. Because, who knows how long it would take me to finish!? As always, feel free to offer any suggestions you have.

Here we are a few months ago ... my snowflake banner was still up, so it must've been wintry out. Our bedspread is looking a little faded (weird lighter spots - from the sun?) and when I painted the walls brown, all of a sudden it was like ...

EVERYTHING. DROWNING. IN. BROWN.

Not good.


My sweet friend visiting from California gave me a few moments of our precious time together to give me some suggestions on the room. We flipped the bedspread over and rearranged the pillows a bit.

Last week I scored a cream tailored bedskirt at a discount store, and reupholstered the headboard in dropcloth fabric.

The headboard definitely pops against the darker wall and I like that I can play a little bit more with the pillow colors - now I'm not limited to gold, tan, brown and blue.

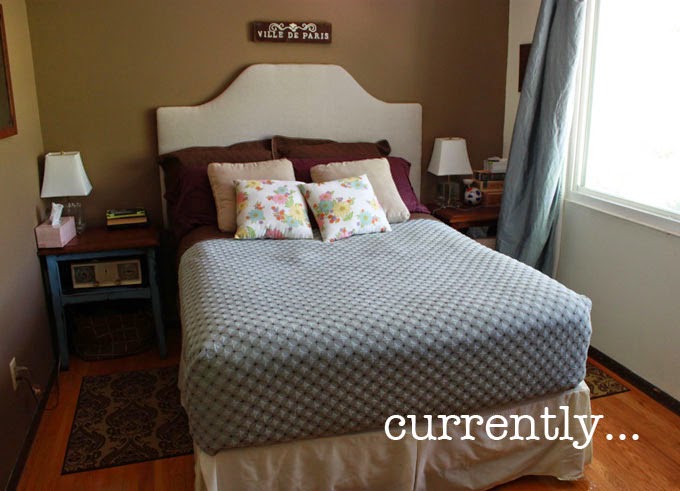
I would love to eventually get a new bedspread and totally change up the colors, but this is what I chose (curtains + bedspread were wedding gifts) and I am determined to make the best of it for now.

Next on my list is making some hanging pendant lights to free up bedside stand space...


Maybe something industrial like these?

link


Or upcycling something vintage and turn it into a pendant light? I'll let you know when I come up with it. It may be a couple of years, but it will be done.

;-)

shop update {7.25.14}

7.25.2014

The boy section in my shop has always been smaller than the girl section. There are just naturally many more cute vintage dresses to be found that than little man stuffs. To make things more complicated, the good boy items also tend to go the fastest in the shop!

Chronic vintage boy clothing issues, friends.

I headed out last week and picked up a couple of items. Three pieces from the same place are quite a find!! So they've been added to bulk up the boy section ... that is, until they sell out ...


Check them out over at the shop!

lions, tigers, and baby birds ... oh my!

6.06.2014

This little guy has been hanging around our front porch lately ... and his Mama in the tree directly above. Watch out below!! (Jeremy's story in his own words after the photo.)


"I experienced a first today. Me and {Ladybug} were watching a sweet little baby blue jay outside, still having some of its baby down on it, and it was learning to fly. Sure enough, mama blue jay came around, squacked like mad, dove right for me, and planted her beak right in my head. Needless to say, me and {Ladybug} went to the swings pretty quick as mama took another dive for us, but missed. True story."

It was true. I saw the evidence when I came home.

:-) Happy Friday! On vacation for the next week ... see ya soon!

inspired shelves (yet unfinished)

6.04.2014

I've never really loved this living room shelf.


I loved the idea of it ... but it turned out pretty underwhelming considering the space.

So, when my FIL was in town for a few days during graduation this month, I twisted his arm and had him help me hang new shelves. I took the two brackets from the previous shelf and stole the other two from the girl's room and used Mandi's inspiration to hang these shelves.

The only thing I did differently was use regular screws for the studs and machine screws (plus hex nuts) for the shelves because the holes were a lot smaller in my brackets than the ones she used.


I've been trying to decide where to use this corbel from my in-laws 100+ year old farm house when it struck me -- looks like an "S"! Why not use it as a monogram? It adds some dramatic height that I love.

I'm going with a bit of a green theme to bring in some color as well as a little purple and yellow ... to bring out the fun colors in my vintage curtains. Love this little ceramic bird from the hobby store, compliments of my sis and bro-in-law. (Gotta love gift cards!)

So, here's my dilemma. I love asymmetry, but I think that the shelves need some balance. All along, I have been planning to put something in the space below, but I can't decide what. 

Any ideas? Here are a few things I've considered.

String art.

source
Vintage arrow or arrow marqee (except they are $$$!)

source

Or a DIY reclaimed wood arrow?

source

Or a framed photo? Or...? Any other ideas I'm missing? I need your help filling this space!

Last question: if you look back at the photo of the shelves, is there too much "fluff" going on? (i.e. the feathers on the left, the faux branches on the right, and the spikey plant on the bottom?) Should I use a different texture? If so, what?

new shop items *may*

6.02.2014

(This is technically a June dated post, but I did get the shop updated in May after everything settled down and I got down to business. :-) Shop update: check!

Look at these fun items!!


See the shop for more views of these awesome finds! (And thanks to my finder, Sarah, for the shoes. This time around we're splitting the profits, but I totally think that's fair for her incredible skill! Business in community - let's do it!)