DIY Industrial Curtain Rod (under $30!)

1.15.2014

Next up, some "industrial" magic!

In November, we got new windows. (*ensue uproarious applause*) Many thanks to our complex and Windows World for their decision to replace the heavy, gunky, leaky (nasty) windows from 1988. 

However, one slight hiccup in the whole replacement process... We have gotten by with a tension rod hanging our bedroom curtains for 4 years. The trim they placed around the windows to seal them up stole that space and made the tension rod unusable. 

Well, darn, I guess I'll have to come up with a DIY solution ... insert DIY Industrial Curtain Rod!

This project definitely was not a lowest-cost-ever DIY. You can definitely find a curtain rod for less than $30. But, if you are going for a certain look (i.e. industrial), it's just gonna cost a little more.

I followed this tutorial but decided to do my own DIY to improve on some of the questions I had along the way.

SUPPLIES:
**from the plumbing section of the hardware store: 2 floor flanges, 2 (90 deg) elbows, 2 nipples (all the same size - I wanted to do 1/2" and it may've proved slightly cheaper, but I wanted it then, so I got what they had - 3/4")
**from the electrical section of the hardware store: one (1) 10 ft length of 3/4" electrical conduit pipe
**from IKEA (or other store with a curtain section): a set of clippy curtain rings

TOOLS:
Screw driver, drill & bits, hack saw (or pipe cutters), #10 phillips screws (mine were 1-1/2" long) and drywall anchors. 


First, I measured and marked where I wanted the flanges to go. (The galvanized metal made quite a mess of my wall where I scooted it around. Beware!) You'll notice that I didn't 1) put them all the way up to the ceiling (naughty) and 2) placed them just outside the perimeter of my window (also design naughty) so my curtains would close. Because seriously people, my curtains were $40 a panel (wedding gift) and I saw no need to replace them, so I'm working with what I have. Thus, my rod placement.

The huge benefit to this was that I didn't actually need the drywall anchors at all! Every time I pulled the drill away from the hole, I realized that I was pulling away bits of wood. The window frame must've been in just the right spot. Woo hoo!

I installed the first flange with 4 screws. Then, I screwed in nipple 1. I thought this might be difficult, but they have some kind of grease on them, so it was very easy to turn. I just turned until it caught - I didn't try to force it.

Then I washed my hands.

Don't forget to put your first curtain clippy loop on before your elbow! This pulls the curtain around to the side so you don't have that annoying light coming in the side of your window on Saturday morning.

Well, I have a 3-year old, the sun never wakes me up. What am I saying? 

Then, screw the elbow on just like you did the nipple, except you will have to work with the placement as it needs to be turned toward the opposite side to hold the actual rod.

Assemble other side like the first but do not attach it to the wall.


Then, measure the distance between the installed corner and where you want the other plus about 1/2" - for the rod to slide into the elbow.  Not gonna lie, this part was difficult to get just right (you'll find out why in a moment).

Mark the pipe and start sawing!

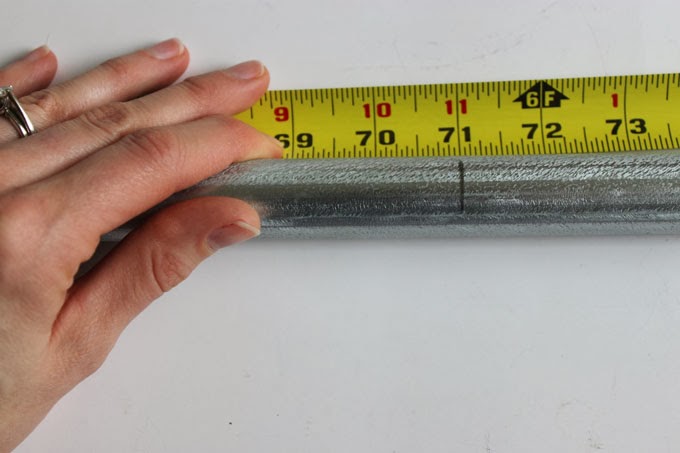
Take a break if you think your arm is going to fall off, and when you've finally cut through, congratulate yourself. (OR, if you have more patience, take the measurement to the hardware store and have them cut it with a pipe cutter in two seconds flat.)


Then, see how it fits. Unfortunately, my measurements were slightly off and ... I had to cut another inch off! Gag.

Lesson learned.

I'd suggest doing the next part with another person, because it was tricky to hold everything in place at once. (Plus, if you are just one person, you can't take pictures of the process!)

Grab a ladder or a chair and insert one side of the rod into the already installed elbow. Then don't forget to put the other curtain rings on (!) and slide the other fully assembled (but not installed) elbow on the other side.

While holding it all in place, screw the other floor flange into the wall. The placement of the drill was kind of awkward at this point, so some of the screws were less than straight, but it wasn't terrible and it is still exremely sturdy. Plus, it looks amazing.


There you have it! A DIY industrial curtain rod all your own for less than $30.

Let me know if I missed anything!

Cost breakdown:

10ft (3/4") metal conduit pipe - $3.12
2 (@$2.37) 90 degree galvanized elbows (3/4") - $4.74
2 (@$1.54) galvanized nipples (3/4" x 2") - $3.08
2 (@ $7.69) 3/4" galvanized floor flanges - $15.38
pack of 8 (10x1-1/2") sheet metal screws - $1.18

TOTAL (including tax) = $29.84

plans {2014}

1.13.2014

Word(s) for 2013: be generous
 I've found that so many opportunities present themselves to be generous to those around us. And not just with our money or stuff (although that is part of it!) but with our time, our words, our forgiveness ... and, amazingly enough, accepting the generosity of others. 

Favorite book of 2013: Unbroken (Hillebrand) so good! I highly recommend it to anyone! 

Best thing that happened last year: my husband started a new job at NTS that he loves. It's made all of our lives better!

Favorite upcycled project: piano key sunburst mirror 

Favorite furniture makeovers: old tv cart and garage sale chair 


******************************************************************

 Plans for 2014 :-)

Word for 2014: BE
This may sound generic or cliche, but I've really been convicted the last few months that more is not better in many ways for me. Especially when I think about stress, no matter what project or good thing I may be working on, too much stress makes me tense, grumpy and unable to be present in my life. Specifically, my projects and doing (especially for the Market and the holidays - thus, the last 4 months of my life) has really crowded out quality time with my sweet girl. Not that I ignore her, don't get me wrong, but just not enough presence with her. Taking in her sweet, big brown eyes. And she's growing up quickly! Let me not miss it. 


I believe other ways of be-ing will quickly show up as I continue to let go of my expectations of myself and perceived expectations of others, as I try to take in my surroundings and live with mindfulness and simplicity, and as I attempt to better my photography by taking more daily photos and appreciating my life.

Goal 1: Taking better photos

Goal 2: Reading some blogging books and implementing some changes on my blog.
I don't really expect to ever make 100K a year from my blog (yes, some people do. it's nuts). I also don't really want to spend 60-80 hours a week making that happen. But, I do want to be more true to myself on my blog. I'm not just about decorating, vintage stuff, and makeovers (although I love all of those!)... but thinking deeply about issues and philosophies of life. I'll be honest, deep thinking is just more difficult when your time is spent with a three year old (!). But I'm planning to incorporate more justice issues and simple living into my blog to make it a more well-rounded picture of who I am and what I'm learning.

I'm kind of hesitant to start this when I'm in the middle of my thought process, but as my wise husband tells me, "If you wait until you have all your ducks in a row and it's perfect, you'll never start." I believe this to be true. So, bear with me as I make changes this year and feel free to interact in the comments! I'd love to hear from you.

Speaking of which, what are your plans for 2014?

Empty ribbon rolls? Make pom poms!

12.26.2013

(Okay, so I lied about being off here until January. I just had a little project I needed to share!)

What happens when you use up all the ribbon from your rolls? You toss them right? (Into the recycling bin, I hope. But if it's the trash, I won't judge you too harshly.)

Instead, here's a super simple project that only takes a couple of things, and you can reuse these ribbon rolls! (Original tutorial came from here.) BAM!

You need: empty ribbon rolls, fluffy yarn, thin yarn (optional), scissors.


Instructions: Pull apart ribbon roll, use scissors to roughly widen the hole to 1". Pull about 7-10 arm lengths of yarn from ball, put both circles together and feed full length of yarn through hole. Continue wrapping yarn through hole and around outside - at least one time around or twice for a fuller pom. Cut ends of yarn, then slide scissors between ribbon roll circles and cut away yarn. Take a small piece of thinner yarn and slide between circles. Tie a knot. Then cut away or slide used ribbon roll circles off.


And your pom is made! This takes a little bit of time, but not too much thought or skill after you get the hang of it.

And how gorgeous is this little puff of wintry goodness?

I made mine into a garland (like the previous tutorial) using glittery gold snowflakes to hang in the space above our headboard. And I love it!


Happy re-using!

Shop Update: 40s and 50s patterns!

12.22.2013

Merry Christmas!! It will be pretty quiet over here until January. I'll be making some changes and working on a little bit different content - a change I'm excited about!

And as we ring in a New Year, I'll be excited to hear your goals, plans and words for the fresh year.

Here's a little ode to the 50s housewife ... don't you want one of these to wear?


Find the rest in my shop!
1, 2, 3, 4, 5, 6, 7, 8, 9, 10, 11

thirty

12.12.2013

I turned 30 on Thanksgiving Day (Nov 28 for all my non-American friends)!

I've been looking forward to starting a new decade and growing into my new-found smile wrinkles. And what better way to celebrate than with flowers, Izze, cheesecake and family??!

please note the girl's contribution to the gift on the right ... i love her thoughtfulness! :-)


My thirtieth year of life has been one of the more stable ones ... so thankful to have my sweet girl, my husband, his much happier job, a few fun side "jobs" on the side of my full-time one (she's cute, isn't she?), and a warm place to live in ... and decorate.

Thanks for celebrating with me!!

DIY etched glass Christmas ornaments

12.11.2013

I love personalizing gifts. Especially if it's something fun, pretty and still inexpensive! 

For all 6 of my piano girls, I wanted to try etching their names onto plain glass Christmas ornaments. My inspiration came HERE and the one and same vinyl dealer, the amazing Dana, hooked me up with the gorgeous stencils for the etching.

But, first, I found some ornaments at the hobby store. 50% off, thank you very much. Dana told me that the etching cream wouldn't work if they were covered in glass varnish, so I crossed my fingers and hoped they weren't.

Supplies needed: 
set of flat plain glass ornaments, unvarnished
vinyl stencils
etching cream
sacrificial paint brush
gloves


I didn't choose the glass orbs, but ones that were flatter, hoping that the stencils would stick better. All those curves aren't ideal for flat stencils! It was a good choice, although I still had to really smooth down the edges near the letters so the etching cream wouldn't leak through.


 I carefully peeled away the backing and smoothed down any edges that came up.


Then, using my throw-away paint brush and gloves, I brushed on a thick coating of etching cream. It had a tendency to pull away from some of the letters, so I had to keep a close eye on them and brushing it back so all of the letters would be etched.


Not all of the letters were perfectly etched, but they were more than good enough! Then, I filled them with old, shredded sheet music and looped some red and white baker's twine to hang them from. And I think they girls will be thrilled.

What I especially love about this project is that the possibilities are endless! You could fill them with fake snow, pearls, sand, confetti, etc. I think I'd love to do an ornament-a-year for Ladybug or for us (etch a different year on each) and then fill it with something that represents the year for us.


(Oh, and while I was at it, I etched "fleurs" (French for flowers) in an old vinegar bottle I'd saved for that purpose. Simple and sweet.

... And sort of addicting. "What should I etch next?!")


What would you etch??

What do you do with leftover pumpkins?

12.09.2013

What do you do with the pumpkins that have graced your home for October and November? 

First, you drag them to the Thanksgiving table for a pretty {natural} centerpiece.


Then, you cook them, of course!!


This may sound silly, but I hate tossing our hard earned pumpkins in the dumpster when it's time to decorate for Christmas. Did you know that any pumpkin (provided it's not gone bad or molded from being carved) is edible? Some taste better than others, like pie pumpkins, etc. but from what I've read, you can cook up any gourd.

So, we did.

My mom helped me cook and puree these babies into 10 cups of homecooked goodness. That's the equivalent of 5 cans of pumpkin. Sweet! I popped them into my freezer when I got home where they now patiently await to be used in delicious recipes.

Pumpkin baking instructions: halve pumpkins with sharp knife, scoop out seeds and pulp, place them cut side down on baking sheets and cook at 350 degrees fahrenheit until very soft and can be easily poked with a fork or knife (an hour or more for larger pumpkins). Cool, then scoop pumpkin from skin and puree. A tiny amount of water can be added if your blender isn't cooperating. 

The seeds can also be baked into a yummy snack! 

Market Items - Discount!!

12.08.2013

Need a last minute Christmas gift or just something pretty for you? I would love to clean out my inventory from the craft shows - and I'll do it for a discount!


(above sconce not available)


Feel free to ask me for dimensions, details or make a reasonable offer and any of these items are yours!