Showing posts with label reuse. Show all posts

Empty ribbon rolls? Make pom poms!

12.26.2013

(Okay, so I lied about being off here until January. I just had a little project I needed to share!)

What happens when you use up all the ribbon from your rolls? You toss them right? (Into the recycling bin, I hope. But if it's the trash, I won't judge you too harshly.)

Instead, here's a super simple project that only takes a couple of things, and you can reuse these ribbon rolls! (Original tutorial came from here.) BAM!

You need: empty ribbon rolls, fluffy yarn, thin yarn (optional), scissors.


Instructions: Pull apart ribbon roll, use scissors to roughly widen the hole to 1". Pull about 7-10 arm lengths of yarn from ball, put both circles together and feed full length of yarn through hole. Continue wrapping yarn through hole and around outside - at least one time around or twice for a fuller pom. Cut ends of yarn, then slide scissors between ribbon roll circles and cut away yarn. Take a small piece of thinner yarn and slide between circles. Tie a knot. Then cut away or slide used ribbon roll circles off.


And your pom is made! This takes a little bit of time, but not too much thought or skill after you get the hang of it.

And how gorgeous is this little puff of wintry goodness?

I made mine into a garland (like the previous tutorial) using glittery gold snowflakes to hang in the space above our headboard. And I love it!


Happy re-using!

What do you do with leftover pumpkins?

12.09.2013

What do you do with the pumpkins that have graced your home for October and November? 

First, you drag them to the Thanksgiving table for a pretty {natural} centerpiece.


Then, you cook them, of course!!


This may sound silly, but I hate tossing our hard earned pumpkins in the dumpster when it's time to decorate for Christmas. Did you know that any pumpkin (provided it's not gone bad or molded from being carved) is edible? Some taste better than others, like pie pumpkins, etc. but from what I've read, you can cook up any gourd.

So, we did.

My mom helped me cook and puree these babies into 10 cups of homecooked goodness. That's the equivalent of 5 cans of pumpkin. Sweet! I popped them into my freezer when I got home where they now patiently await to be used in delicious recipes.

Pumpkin baking instructions: halve pumpkins with sharp knife, scoop out seeds and pulp, place them cut side down on baking sheets and cook at 350 degrees fahrenheit until very soft and can be easily poked with a fork or knife (an hour or more for larger pumpkins). Cool, then scoop pumpkin from skin and puree. A tiny amount of water can be added if your blender isn't cooperating. 

The seeds can also be baked into a yummy snack! 

projects update: entry table makeover

9.23.2013

After being quite unhappy with a recent priming then painting job, I asked around for make-your-own chalk paint recipe and (after sanding) tried it out on this table! I got a free 7.5oz Valspar sample from Lowe's in Mountain Smoke (or a beige gray ..."greige" to be exact) and knew it was for this thrifted table.


It needed some love. So I sanded the heck out of it (probably 5-6 hours worth with all those little details!) and then painted it with THIS chalk paint recipe. And here it is!


I love the details! The weird spiral spot on top (see original pic) actually needs a little more work (a.k.a more sanding) but I'm hoping to sand and repaint that small spot and then clear wax the whole thing.

What do you think??

new legs! {hairpin table legs, that is}

4.24.2013


A little project last weekend made me VERY happy. I'll admit up front that it's not earth-shattering or extremely shocking and beautiful. But for me, it's amazing.

Backstory: I've tried to be content with my kitchen table for the last 5 years and for the most part I have been. Jeremy got it for free before we got married and we've used it ever since. I've been thankful to have a table. Really.

But honestly, I've hated how it looks. Even with paint and recovering, the chairs and table legs would just be ugly. I have worked hard to see any redeeming decorative qualities, and/or ways to make it prettier, but I just can't.


So maybe a year ago I realized that I liked the top just fine (it was easy to clean!!), so maybe I could change out the legs. Then, I saw these legs sticking out of the dumpster and got excited.

It ended up that those legs weren't easily removable, so I traded that whole table in for my other craft table. But, we were back to square one with our kitchen table.

Then I recently ran into leg inspiration found here, here and here. And after letting hairpin legs grow on me, I was sold. Those I could do this!

So this weekend, I did.

Before:

After! 


It looks cleaner, simpler, more modern with a little bit of industrial. Love! 
(Hairpin legs found here.)


With a few #10 screws and a few drill recharges, it was Lisa's oh happy day! I am working to replace all of the chairs with mismatched, thrifted chairs and will update when that is finished, but for now, REJOICE!

:-)

a "new" craft table

1.22.2013

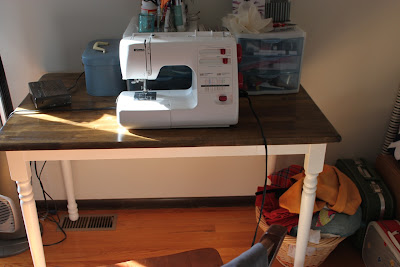
Before the Market in October, I spotted these white legs in the dumpster outside our townhome. Wa-what?


When I pulled it up, I realized why. But it was just a bit of water damage, couldn't it be redone? Donate it, people! Let someone else put a tablecloth on it. Why does it need to go to the landfill?Ehh ... pet peeve.


So I sanded and sanded some more and got down to where I thought it was good enough to stain and coat. Unfortunately, after I stained it, the large ring (see above pic) still stands out. Otherwise, I think it looks great! I wiped a couple of coats of Minwax Dark Walnut on it and wished I had a garage (for ventilation but no Kansas wind) when I sprayed the Minwax Polyurethane - clear gloss - to top it.  But it turned out fine.

I used it to sit behind at the Market then traded my chunky craft table (got it from CL, resold it there) in for this slightly smaller one.


Here she is!


As Ladybug would say, "Pitty!" I'm pleased.

a record player update (finally!)

11.15.2012

(Breaking out some (new) old posts here.)

Sorry for the wait on the record player! I know you've been sitting at the edge of your seat for months now. Haha. Actually, I'm sure you've forgotten but I haven't! The record player, unfortunately, does not have a home upstairs in the natural light because 1) we don't have a good space for it yet and 2) Ladybug has pulled the glass tubes out and we don't want them breaking! That has made it difficult to photograph - it's pretty dark in the basement!

Here is my last post about it. (Really? Over a year ago?)

Anyway. I had to pull off and sand a bunch of glued on veneer. The point has never been to refurbish the wood (as this would be too pricey and over my head) but rather, because of the water damage and 25 cent price tag) to paint it whatever color I wanted.


I sanded the whole thing down and then glued my own veneer pieces to the sides. This brought the sides flush with the corner pieces (unlike the original) but I was okay with that.

Make sure you have enough clamps! I'd already glued it and then had to run (literally!) to the store before the glue set to buy more clamps.

Disaster averted.


Here is the BEFORE:


And the AFTER!


We brought it up to enjoy some old music with friends and family on the girl's birthday.

After it was glued and the holes filled with wood filler, I painted it in a flat Clark and Kensington "Yarrow Point" then aged it a bit with Annie Sloan's Dark Wax.  Then we took an old door pull from this project and screwed it in with a new screw.


I kept the inside its beautiful dark wood and the record player mechanism looks like it did 60 years ago!


It's far from perfect - I would love to replace the speaker fabric under the face (but that would require disassembly, perhaps with a crowbar!) and the floor of the cupboard is damaged beyond sanding and painting - but it's ours and it's lovely.


Now if there was only a perfect home for it upstairs. Maybe someday!

Here's a little taste of its sound.


record player from Lisa Shunk on Vimeo.

Cheers!

(Can you believe Thanksgiving is in a week!? November has flown by...)

Reclaimed Lumber Shelf

9.28.2012

A DIY on the reclaimed wood shelf in the living room makeover...

So I was driving to my last piano lesson of the day one Monday evening and I spotted some fence boards on the side of the road. On my way back home, I stopped to pick them up. It was obvious that they had been replaced because of some defect, but I chose boards that were salvageable.

The next day I hammered out all of the nails (duh).


Measured a 38-in shelf...


Then broke in my trusty handsaw and cut the boards to the same length.


Then I took a wire brush to get any dirt, splinters, etc from them. I wanted to keep the rustic, weather-worn look, so I didn't sand, etc. I knew it would also be up high enough from wandering toddler fingers that I didn't really need to worry about getting it super smooth. (Dusting it, however, is a challenge...)

I cut two small support boards from the leftover wood and nailed/screwed them all into place.


We screwed the decorative shelf brackets (found at Hobby Lobby clearance - $4 ea - a couple years ago) into two studs and then screwed the shelf from beneath.


And, here she is! Even after some decorating friend consultation, I'm still not 100% satisfied with it, but I'm working on it. I know you saw it yesterday, but to complete the post - here she is! 

some antique finds ... and a fun announcement!

9.04.2012

So when we were in Ohio, we went thrifting. And along the way stopped at an antique store. I found four blue glass Ball jars with zinc lids for $4 a piece! The only booth in the place that had good prices and I wanted to support it.

Here they are featured in my newly shabby-chic-ed wooden wine rack.


And speaking of vintage, antique, rustic, shabby chic, distressed, handmade ... I not only opened up a new shop this month, next month I'm going to be a vendor at a two day Christmas market!! I'm super excited, working really hard and scared no one will buy a thing, but I'm going to go for it anyway!

So up until the last weekend of October, I'm going to find myself up to my ears in old wood and paint, but I'm so happy I get this chance.

Jeremy suggested that I go "thrifting" in his parents' basement and whaddayaknow? I found some amazing stuff.  I'll feature some of it individually when it's fixed up (before and afters) but look at this amazing pile of antique goodness! Some would call it junk, but it's treasure to me.


Can't wait to show you my creations!

Oh, and I found this clutch for $1.


It even had matching gloves inside!! They are way too small for my big hands, but I love it. Muah!


More on the Christmas market soon!

a 1943 bi-plane ride

8.27.2012

(One more Ohio post... and it's a special one!)

Jeremy was surprised with a 20 minute ride in a 1943 bi-plane (restored) for his birthday while we were in Ohio. So cool!


The pilot (and owner) runs an aircraft refurbishing business and they sell or give those planes to mission organizations or other non-profits that need airplane access. (For example ... Mission Aviation Fellowship in Haiti got a plane from them to fly in the mail - among other things like people and cargo - from Florida every week! Ring a bell, Kosters?) Talk about re-using - they essentially take wrecked planes and rebuild them, giving planes that wouldn't have had a chance except for parts another life!


Jeremy getting in!


Ready to go!


Coming in for a landing (on the grass).


A happy birthday boy. (Thanks again Shunks!)


George rode after Jeremy ...

And guess who else got a surprise ride?! Super fun.


(Dad, you would've LOVED it.)